
- Thomas Pollinger
- 07.11.2016
- DE
Gewusst wie! "Hotfix per Kommandozeile installieren"
Es ist ja immer so eine Sache mit den Updates einer Software. Auf der einen Seite möchte man aktuell sein, auf der anderen Seite scheut man den Aufwand eines jeden Updates.
Jedoch mit OpenText™ Web Site Management und dem OneClick™Installer, welchen es seit Release 11 gibt. Sind die Aufwände für ein Update, gegenüber anderen Produkten am Markt, extrem gering.
OneClick™ Installer deutet vielleicht erstmal daraufhin, man muss mit der Maus immer wieder klicken. Ja, das ist einer der Wege um die Management (RedDot CMS) Server auf den neusten Stand zu bringen. Jedoch es gibt noch einen weiteren ;) ... und diese weitere Möglichkeit schauen wir uns nun mal näher an.
Also liebe System- / Windows-Administratoren, Bleistift gespitzt, Kaffee geholt und los gehts...
Grundlagen
Der Installationsprozess wurde seit Release 11 in zwei Schritte aufgeteilt:
- Installation
- Konfiguration
Beide Schritte sind entweder per Graphical User Interface (GUI) oder Command Line Interface (CLI) möglich. Jedoch wird letzteres bei OpenText™ als s.g. Unattended console installation (UCI) bezeichnet. Als erstes schauen wir uns mal die reine Installation an...
Der Windows® Installer des Management Server
Als erstes möchte ich auf die, bei jedem Installationspaket beiliegenden, Release Notes hinweisen. Diesem Dokument gibt es ein Kapitel mit dem Namen Starting the installer from command line und gibt einen ersten Einblick wie das ganze funktioniert. Ebenso das Installations-Handbuch ist sehr hilfreich, da im Kapitel 3 Unattended console installation alle restlichen Parameter beschrieben werden.
Jedoch ist es nicht verkehrt diese beiden Befehle, mit der jeweiligen korrekten Syntax, der ausgewählten Kommandozeilen zu kennen:
PS C:\Temp> .\Setup.exe /?
C:\Temp> Setup.exe /?
Mit diesem Befehl bekommt man alle Optionen des s.g. Windows ® Installer aufgelistet:
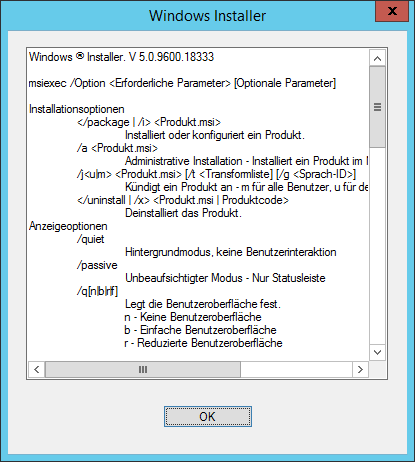
Diese Parameter sind, je nach Anwendungsfall, sehr hilfreich und gliedern sich in die folgenden Gruppen:
msiexec /Option <Erforderliche Parameter> [Optionale Parameter]

Installationsoptionen:
    </package | /i> <Produkt.msi>
        Installiert oder konfiguriert ein Produkt.
    /a <Produkt.msi>
        Administrative Installation - Installiert ein Produkt im Netzwerk.
    /j<u|m> <Produkt.msi> [/t <Transformliste] [/g <Sprach-ID>]
        Kündigt ein Produkt an - m für alle Benutzer, u für den aktuellen Benutzer
    </uninstall | /x> <Produkt.msi | Produktcode>
        Deinstalliert das Produkt.

Anzeigeoptionen:
    /quiet
        Hintergrundmodus, keine Benutzerinteraktion
    /passive
        Unbeaufsichtigter Modus - Nur Statusleiste
    /q[n|b|r|f]
        Legt die Benutzeroberfläche fest.
        n - Keine Benutzeroberfläche
        b - Einfache Benutzeroberfläche
        r - Reduzierte Benutzeroberfläche
        f - Vollständige Benutzeroberfläche (Standard)
    /help
        Hilfeinformationen

Neustartoptionen:
    /norestart
        Kein Neustart nach Abschluss der Installation
    /promptrestart
        Benutzereingabe, falls Neustart erforderlich ist
    /forcerestart
        Computer nach Abschluss der Installation immer neu starten

Protokolllierungsoptionen:
    /l[i|w|e|a|r|u|c|m|o|p|v|x|+|!|*] <Protokolldatei>
        i - Statusmeldungen
        w - Nicht schwerwiegende Warnungen
        e - Alle Fehlermeldungen
        a - Ausführung von Aktionen
        r - Aktionsspezifische Einträge
        u - Benutzeranforderungen
        c - Ursprüngliche Benutzeroberflächenparameter
        m - Informationen betreffend zuwenig Arbeitsspeicher oder schwerwiegendem Abbruch
        o - Meldungen betreffend zuwenig Speicherplatz
        p - Terminaleigenschaften
        v - Ausführliche Ausgabe
        x - Zusätzliche Debuginformationen
        + - An vorhandene Protokolldatei anhängen
        ! - Jede Zeile ins Protokoll aufnehmen
        * - Alle Informationen mit Ausnahme der Optionen v und x protokollieren
    /log <Protokolldatei>
        Entspricht /l* <Protokolldatei>

Aktualisierungsoptionen:
    /update <Update1.msp>[;Update2.msp]
        Übernimmt Update(s).
    /uninstall <Patchcode-GUID>[;Update2.msp] /package <Produkt.msi | Produktcode>
        Entfernt Update(s) für ein Produkt.

Reparaturoptionen:
    /f[p|e|c|m|s|o|d|a|u|v] <Produkt.msi | Produktcode>
        Repariert ein Produkt.
        p - nur wenn eine Datei fehlt
        o - wenn eine Datei fehlt oder eine ältere Version installiert ist (Standard)
        e - wenn eine Datei fehlt oder eine gleiche bzw. ältere Version installiert ist
        d - wenn eine Datei fehlt oder eine andere Version installiert ist
        c - wenn eine Datei fehlt oder die Prüfsumme nicht mit dem berechneten Wert übereinstimmt
        a - Erzwingt die Neuinstallation aller Dateien
        u - Alle erforderlichen benutzerspezifischen Registrierungseinträge (Standard)
        m - Alle erforderlichen Computerspezifischen Registrierungseinträge (Standard)
        s - Alle vorhandenen Verknüpfungen (Standard)
        v - Führt von der Quelle aus und speichert das lokale Paket zwischen

Öffentliche Eigenschaften festlegen:
    [PROPERTY=Eigenschaftswert]
Tipp: Wenn die PowerShell zum Einsatz kommt, sollte man diese Funktion verwerden:
(Start-Process -FilePath "msiexec.exe" -ArgumentList "Parameter" -Wait -Passthru).ExitCode
Mehr dazu gleich in den nachfolgenden Beispielen...
Öffentliche Eigenschaften für die Management Server Installation
Dazu kommen noch die für den Management (RedDot CMS) Server notwendigden Öffentliche Eigenschaften des Windows Installers:
APPPOOL_USERNAME:
Name of apppooluser used for the IIS Application pool in which Management Server is running.

APPPOOL_PASSWORD:
Password for APPPOOL_USERNAME.

SERVICE_USERNAME:
Name of serviceuser used for running the WSM services. Prepend the host name, domain name or .\ for localhost to the user name.

SERVICE_PASSWORD:
Password for SERVICE_USERNAME. Note that this user must have a password.

IIS_APPLICATION_ALIAS:
Name of the web application hosting Management Server.

IIS_WEBSITE_NAME:
Defines the name of the web site inside IIS. The web site must already exist before you start the installation.

IIS_WEBSITE_IP:
The IIS web site hosting Management Server will use this IP address.

IIS_WEBSITE_PORT:
The IIS web site hosting the Management Server will use this port.

TARGETDIR:
Installation directory.

MOBILECLIENT_APPLICATION_ALIAS:
Name of the web application hosting the Mobile Client of Management Server.

MOBILECLIENT_WEBSITE_NAME:
Defines the name of the web site inside IIS. This parameter string must not contain spaces because then the IIS Manager will not find the corresponding web.config file. The web site name must be the same as in IIS_WEBSITE_NAME.

MOBILECLIENT_WEBSITE_IP:
The IIS web site hosting Management Server will use this IP address.

MOBILECLIENT_WEBSITE_PORT:
The IIS web site hosting the Management Server will use this port.

DEVICEPREVIEW_APPLICATION_ALIAS:
Name of the web application hosting the Management Server device preview.

DEVICEPREVIEW_WEBSITE_NAME:
Defines the name of the web site inside IIS where the device preview will be hosted. This parameter string must not contain spaces because then the IIS Manager will not find the corresponding web.config file. The web site must already exist before you start the installation. The website has to contain an HTTPS binding on an arbitrary port and an additional HTTPS binding on port...

DEVICEPREVIEW_WEBSITE_IP:
The IIS web site hosting Management Server will use this IP address.

DEVICEPREVIEW_WEBSITE_PORT:
The IIS web site hosting the Management Server will use this port. The value must be different from the setting that has been selected for the IIS_WEBSITE_PORT.
Hinweis: In dem o.g. Abschnitt für die spezifischen Management (RedDot CMS) Server Parameter, wurden bewusst die s.g. Default values aus den Beschreibungen entfernt. Diese sind jedoch in jeder vorliegenden PDF-Dokumentation der Software, im OpenText™ Knowledge Center oder in der Online-Hilfe hinterlegt.
Kommandozeilen-Beispiele für ein Update oder die erste Installation
Ob nun für ein Update oder eine Installation, welche ohne manuellen Eingriff über die Benutzeroberfläche (GUI) erfolgen soll, benötigt man erstmal die Werte der o.g. Öfflichen Eigenschaften des Management (RedDot CMS) Servers.
Mit diesen Werten könnte eine Befehlszeile für ein Update oder eine Installation für eine Basis-Installation wie folgt aussehen:
PS C:\Temp> (Start-Process -FilePath 'msiexec.exe' -ArgumentList '/qr /i C:\Temp\OpenText.WS.MS.Installation.msi /l*v C:\Temp\install.log APPPOOL_USERNAME="WSMUser" APPPOOL_PASSWORD="WSMUserPasswort" SERVICE_USERNAME=".\WSMUser" SERVICE_PASSWORD="WSMUserPasswort" TARGETDIR="C:\OpenText\WS\MS" IIS_APPLICATION_ALIAS="CMS" IIS_WEBSITE_NAME="Default Web Site" IIS_WEBSITE_IP="*" IIS_WEBSITE_PORT="443"' -Wait -Passthru).ExitCode
C:\Temp> msiexec /qn /i OpenText.WS.MS.Installation.msi /l*v install.log APPPOOL_USERNAME="WSMUser" APPPOOL_PASSWORD="WSMUserPasswort" SERVICE_USERNAME=".\WSMUser" SERVICE_PASSWORD="WSMUserPasswort" TARGETDIR="C:\OpenText\WS\MS" IIS_APPLICATION_ALIAS="CMS" IIS_WEBSITE_NAME="Default Web Site" IIS_WEBSITE_IP="*" IIS_WEBSITE_PORT="443"
Wenn man noch zeitgleich den MobileClient installieren möchte, sieht die Befehlszeile wie folgt aus:
PS C:\Temp> (Start-Process -FilePath 'msiexec.exe' -ArgumentList '/qr /i C:\Temp\OpenText.WS.MS.Installation.msi /l*v C:\Temp\install.log APPPOOL_USERNAME="WSMUser" APPPOOL_PASSWORD="WSMUserPasswort" SERVICE_USERNAME=".\WSMUser" SERVICE_PASSWORD="WSMUserPasswort" TARGETDIR="C:\OpenText\WS\MS" IIS_APPLICATION_ALIAS="CMS" IIS_WEBSITE_NAME="Default Web Site" IIS_WEBSITE_IP="*" IIS_WEBSITE_PORT="443" MOBILECLIENT_APPLICATION_ALIAS="WSM" MOBILECLIENT_WEBSITE_NAME="Default Web Site" MOBILECLIENT_WEBSITE_IP="*" MOBILECLIENT_WEBSITE_PORT="443"' -Wait -Passthru).ExitCode
C:\Temp> msiexec /qn /i OpenText.WS.MS.Installation.msi /l*v install.log APPPOOL_USERNAME="WSMUser" APPPOOL_PASSWORD="WSMUserPasswort" SERVICE_USERNAME=".\WSMUser" SERVICE_PASSWORD="WSMUserPasswort" TARGETDIR="C:\OpenText\WS\MS" IIS_APPLICATION_ALIAS="CMS" IIS_WEBSITE_NAME="Default Web Site" IIS_WEBSITE_IP="*" IIS_WEBSITE_PORT="443" MOBILECLIENT_APPLICATION_ALIAS="WSM" MOBILECLIENT_WEBSITE_NAME="Default Web Site" MOBILECLIENT_WEBSITE_IP="*" MOBILECLIENT_WEBSITE_PORT="443"
Oder man möchte den MobileClient nachinstallieren, dann sieht die Befehlszeile wie folgt aus:
PS C:\Temp> (Start-Process -FilePath 'msiexec.exe' -ArgumentList '/qr /i C:\Temp\OpenText.WS.MS.Installation.msi /l*v C:\Temp\install.log APPPOOL_USERNAME="WSMUser" APPPOOL_PASSWORD="WSMUserPasswort" SERVICE_USERNAME=".\WSMUser" SERVICE_PASSWORD="WSMUserPasswort" TARGETDIR="C:\OpenText\WS\MS" MOBILECLIENT_APPLICATION_ALIAS="WSM" MOBILECLIENT_WEBSITE_NAME="Default Web Site" MOBILECLIENT_WEBSITE_IP="*" MOBILECLIENT_WEBSITE_PORT="443"' -Wait -Passthru).ExitCode
C:\Temp> msiexec /qn /i OpenText.WS.MS.Installation.msi /l*v install.log APPPOOL_USERNAME="WSMUser" APPPOOL_PASSWORD="WSMUserPasswort" SERVICE_USERNAME=".\WSMUser" SERVICE_PASSWORD="WSMUserPasswort" TARGETDIR="C:\OpenText\WS\MS" MOBILECLIENT_APPLICATION_ALIAS="WSM" MOBILECLIENT_WEBSITE_NAME="Default Web Site" MOBILECLIENT_WEBSITE_IP="*" MOBILECLIENT_WEBSITE_PORT="443"
Wenn man noch zeitgleich die DevicePreview installieren möchte, sieht die Befehlszeile wie folgt aus:
PS C:\Temp> (Start-Process -FilePath 'msiexec.exe' -ArgumentList '/qr /i C:\Temp\OpenText.WS.MS.Installation.msi /l*v C:\Temp\install.log APPPOOL_USERNAME="WSMUser" APPPOOL_PASSWORD="WSMUserPasswort" SERVICE_USERNAME=".\WSMUser" SERVICE_PASSWORD="WSMUserPasswort" TARGETDIR="C:\OpenText\WS\MS" IIS_APPLICATION_ALIAS="CMS" IIS_WEBSITE_NAME="Default Web Site" IIS_WEBSITE_IP="*" IIS_WEBSITE_PORT="443" DEVICEPREVIEW_APPLICATION_ALIAS="DevicePreview" DEVICEPREVIEW_WEBSITE_NAME="Device Preview Web Site" DEVICEPREVIEW_WEBSITE_IP="*" DEVICEPREVIEW_WEBSITE_PORT="443"' -Wait -Passthru).ExitCode
C:\Temp> msiexec /qn /i OpenText.WS.MS.Installation.msi /l*v install.log APPPOOL_USERNAME="WSMUser" APPPOOL_PASSWORD="WSMUserPasswort" SERVICE_USERNAME=".\WSMUser" SERVICE_PASSWORD="WSMUserPasswort" TARGETDIR="C:\OpenText\WS\MS" IIS_APPLICATION_ALIAS="CMS" IIS_WEBSITE_NAME="Default Web Site" IIS_WEBSITE_IP="*" IIS_WEBSITE_PORT="443" DEVICEPREVIEW_APPLICATION_ALIAS="DevicePreview" DEVICEPREVIEW_WEBSITE_NAME="Device Preview Web Site" DEVICEPREVIEW_WEBSITE_IP="*" DEVICEPREVIEW_WEBSITE_PORT="443"
Oder man möchte die DevicePreview nachinstallieren, dann sieht die Befehlszeile wie folgt aus:
PS C:\Temp> (Start-Process -FilePath 'msiexec.exe' -ArgumentList '/qr /i C:\Temp\OpenText.WS.MS.Installation.msi /l*v C:\Temp\install.log APPPOOL_USERNAME="WSMUser" APPPOOL_PASSWORD="WSMUserPasswort" SERVICE_USERNAME=".\WSMUser" SERVICE_PASSWORD="WSMUserPasswort" TARGETDIR="C:\OpenText\WS\MS" DEVICEPREVIEW_APPLICATION_ALIAS="DevicePreview" DEVICEPREVIEW_WEBSITE_NAME="Device Preview Web Site" DEVICEPREVIEW_WEBSITE_IP="*" DEVICEPREVIEW_WEBSITE_PORT="443"' -Wait -Passthru).ExitCode
C:\Temp> msiexec /qn /i OpenText.WS.MS.Installation.msi /l*v install.log APPPOOL_USERNAME="WSMUser" APPPOOL_PASSWORD="WSMUserPasswort" SERVICE_USERNAME=".\WSMUser" SERVICE_PASSWORD="WSMUserPasswort" TARGETDIR="C:\OpenText\WS\MS" DEVICEPREVIEW_APPLICATION_ALIAS="DevicePreview" DEVICEPREVIEW_WEBSITE_NAME="Device Preview Web Site" DEVICEPREVIEW_WEBSITE_IP="*" DEVICEPREVIEW_WEBSITE_PORT="443"
Man kann selbstverständlich auch beide Optionen zeitgleich installieren, dann sieht der Befehl wie folgt aus:
PS C:\Temp> (Start-Process -FilePath 'msiexec.exe' -ArgumentList '/qr /i C:\Temp\OpenText.WS.MS.Installation.msi /l*v C:\Temp\install.log APPPOOL_USERNAME="WSMUser" APPPOOL_PASSWORD="WSMUserPasswort" SERVICE_USERNAME=".\WSMUser" SERVICE_PASSWORD="WSMUserPasswort" TARGETDIR="C:\OpenText\WS\MS" IIS_APPLICATION_ALIAS="CMS" IIS_WEBSITE_NAME="Default Web Site" IIS_WEBSITE_IP="*" IIS_WEBSITE_PORT="443" MOBILECLIENT_APPLICATION_ALIAS="WSM" MOBILECLIENT_WEBSITE_NAME="Default Web Site" MOBILECLIENT_WEBSITE_IP="*" MOBILECLIENT_WEBSITE_PORT="443" DEVICEPREVIEW_APPLICATION_ALIAS="DevicePreview" DEVICEPREVIEW_WEBSITE_NAME="Device Preview Web Site" DEVICEPREVIEW_WEBSITE_IP="*" DEVICEPREVIEW_WEBSITE_PORT="443"' -Wait -Passthru).ExitCode
C:\Temp> msiexec /qn /i OpenText.WS.MS.Installation.msi /l*v install.log APPPOOL_USERNAME="WSMUser" APPPOOL_PASSWORD="WSMUserPasswort" SERVICE_USERNAME=".\WSMUser" SERVICE_PASSWORD="WSMUserPasswort" TARGETDIR="C:\OpenText\WS\MS" IIS_APPLICATION_ALIAS="CMS" IIS_WEBSITE_NAME="Default Web Site" IIS_WEBSITE_IP="*" IIS_WEBSITE_PORT="443" MOBILECLIENT_APPLICATION_ALIAS="WSM" MOBILECLIENT_WEBSITE_NAME="Default Web Site" MOBILECLIENT_WEBSITE_IP="*" MOBILECLIENT_WEBSITE_PORT="443" DEVICEPREVIEW_APPLICATION_ALIAS="DevicePreview" DEVICEPREVIEW_WEBSITE_NAME="Device Preview Web Site" DEVICEPREVIEW_WEBSITE_IP="*" DEVICEPREVIEW_WEBSITE_PORT="443"
Tipp: Wenn man zum ersten Mal diese Form der Installation verwendent, biete es sich an die GUI bei den Testläufen sichtbar zu haben. Dazu ändert man einfach den Parameter /qn auf z.B. /qr und kann dann die Installation optisch mitverfolgen. Wenn die Testläufe dann rund und zufriedenstellend laufen, kann man jederzeit den Parameter wieder zurück auf /qn stellen.
Hinweis: Bei Verwendung der PowerShell, sollte diese mit Administrator-Berechtigungen gestartet werden. Je nach Installation des Servers, kann es auch notwendig werden bestimmte Zugriffe erstmalig zu aktivieren. Mehr zum Thema PowerShell findet man auf der Microsoft™ PowerShell Webseite und dort speziell in dem Bereich PowerShell-Skripterstellung.
Wenn nun die Installation abgeschlossen bzw. erfolgreich durchgelaufen ist. Wird es Zeit sich den zweiten Schritt, die Konfiguration anzusehen...
Konfiguration des Management Servers
Nach der Installation, ist meist vor der Konfiguration. Dazu empfiehlt es sich das Kapitel Editing the configuration file in der Online-Hilfe bzw. im Installations-Handbuch zu lesen.
Hier mal das Konfigurations-Beispiel (ConfigurationUtility.exe.config.sample) einer Management Server Installation:
<?xml version="1.0"?> <configuration> <configSections> <section name="ManagementServer" type="OpenText.WS.MS.ConfigurationUtility.Common.Settings.ManagementServerConfigurationSection, ConfigurationUtility.Common, Version=16.0.0.0, Culture=neutral, PublicKeyToken=9763136d9e6661ad"/> </configSections> <startup> <supportedRuntime version="v4.0" sku=".NETFramework,Version=v4.6.1"/> </startup> <!-- Username and Password define the credentials for Management Server's administrative user. LicenseKey holds the license key for this machine. SpellcheckingHost defines the host used for spellchecking. --> <ManagementServer Username="admin" Password="" LicenseKey="" SpellcheckingHost="spell.reddot.de"> <!-- Defines a list of connections to MS SQL servers. --> <MSSQL_Connections> <!-- Name is used to reference this connection; must be unique over all(!) connections, including Oracle connections. Datasource defines the hostname, port and/or instance name of the MS SQL server. AuthentificationMode specifies the logon method. Valid arguments: Server, Windows. Server authentification mode refers to the logon method using an MSSQL Server user account. Windows authentification mode refers to the logon method using an windows user account. This method is also known as "Integrated Security" or "Trusted Connection". --> <add Name="MSSQLDatabaseConnection" Datasource="localhost" AuthentificationMode="Server"> <!-- Username and Password define the credentials needed for logging in to MS SQL server. ConnectionStringTemplate holds the template used for creating the connection string. The following placeholders will be replaced with the contents of the respective attributes: %datasource% - %databasename% - %username% - %password%. To make sure the password is stored encrypted, DO NOT write the password into the template. Instead, use the %password% placeholder. --> <ServerAuthentification ConnectionStringTemplate="Provider="sqloledb";Data Source="%datasource%";Initial Catalog="%databasename%";User Id="%username%";Password="%password%";" Username="" Password=""/> <!-- ConnectionStringTemplate holds the template used for creating the connection string. The following placeholders will be replaced with the contents of the respective attributes: %datasource% - %databasename%. --> <WindowsAuthentification ConnectionStringTemplate="Provider="sqloledb";Data Source="%datasource%";Initial Catalog="%databasename%";Trusted_Connection=yes;"/> </add> </MSSQL_Connections> <!-- Defines a list of connections to Oracle servers. --> <Oracle_Connections> <!-- Name is used to reference this connection; must be unique over all(!) connections, including MSSQL connections. TNSName defines the service name as stored in tnsnames.ora. ConnectionStringTemplate holds the template used for creating the connection string. The following placeholders will be replaced with the contents of the respective attributes: %tnsname% - %schema% - %password%. To make sure the password is stored encrypted, DO NOT write the password into the template. Instead, use the password% placeholder. --> <add Name="OracleDatabaseConnection" TNSName="" ConnectionStringTemplate="Provider=ORAOLEDB.ORACLE;Data Source=%tnsname%;User Id=%schema%;Password=%password%;prompt=noprompt;Validate Connection=true;Max Pool Size=250;"/> </Oracle_Connections> <!-- Hostname defines the NetBIOS name (15 characters) or the IPv4 address of the current host. DO NOT CHANGE the attributes Port, WebSiteName and VirtualDirectory; they are auto-generated by the installer. --> <IisSettings Hostname="localhost" WebSiteName="Default Web Site" VirtualDirectory="CMS" Port="443"/> <!-- SetupType defines which action to take for Administration database. Valid arguments: CreateAdministration, UpdateAdministration, ClusterNode, DoNothing. CreateAdministration: Create a new Administration Database (MSSQL:automatic,Oracle:semi-automatic) UpdateAdministration: Reconnects the Administration Database of an old Version and updates it. ClusterNode: Updates or connects a cluster node to an administration as necessary. DoNothing: Does not handle Administration Database DatabaseType defines which DBMS will be accessed by Management Server. Valid arguments: MSSQL, Oracle.--> <AdministrationDatabase SetupType="CreateAdministration" DatabaseType="MSSQL"> <!-- Connection references the MSSQL_Connection with the given name; it must be defined above. Databasename defines the name for the administrative database. It will be created by Management Server. --> <MSSQL_Data Connection="MSSQLDatabaseConnection" Databasename="ioAdministration"/> <!-- Connection references the Oracle_Connection with the given name; it must be defined above. Schema defines the name for the administrative database. It must be created before running the ConfigurationUtility. Password is used to authenticate against the Schema.--> <Oracle_Data Connection="OracleDatabaseConnection" Schema="ioAdministration" Password=""/> </AdministrationDatabase> <ImportProjects> <!-- Defines a list of projects to be imported into an MS SQL DBMS. Add as many entries as you like. --> <MSSQL> <!-- Connection references the MSSQL_Connection with the given name; it must be defined above. SourcePath defines the path from which to import. Valid arguments: Xample or any absolute path containing an exported project. The path must be readable by the Management Server without entering any credentials. Name defines the project name shown in Management Server UI. Databasename defines the database. --> <!--<add Connection="MSSQLDatabaseConnection" SourcePath="Xample" Name="Xample" Databasename="XampleProject" />--> </MSSQL> <!-- Defines a list of projects to be imported into an Oracle DBMS. Add as many entries as you like. --> <Oracle> <!-- Connection references the Oracle_Connection with the given name; it must be defined above. SourcePath defines the path from which to import. Valid arguments: Xample or any absolute path containing an exported project. The path must be readable by the Management Server without entering any credentials. Name defines the project name shown in Management Server UI. Schema defines the name for the administrative database. It must be created before running the ConfigurationUtility. Password is used to authenticate against the Schema.--> <!--<add Connection="OracleDatabaseConnection" SourcePath="Xample" Name="Xample" Schema="XampleProject" Password="" />--> </Oracle> </ImportProjects> </ManagementServer> </configuration>
Die genaue Beschreibung der einzelnen Parameter der ConfigurationUtility.exe.config sind in der Online-Hilfe im Kapitel Editing the configuration file genau beschrieben. Bei dieser Datei ist es so, dass je nach Umgebung die Parameter explizit angepasst werden müssen. Daher empfiehlt es sich auf jeden Fall eine Testinstallation durchzuführen.
Tipp: Man kann auch die grafische Version ConfigurationUtilityGui.exe nutzen und dann die ganzen Einstellungen am Ende abspeichern. So hat man dann eine fertig zugeschnittene ConfigurationUtility.exe.config und kann diese sicher verwahren bzw. später immer wieder verwenden. Dabei werden auch gleich die verwendeten Passworte verschlüsselt abgespeichert.
Die 7 Schritte zur erfolgreichen Skript-Installation
- Die Kommandozeile der Wahl mit Administrator-Berechtigung öffnen.
- In das Verzeichnis wechseln in dem das Installationspaket liegt.
- Den für die aktive Umgebung passende Installationsskript starten (Beispiele siehe weiter oben).
- Wenn die Installation abgeschlossen ist, in das Verzeichnis %rdcms%\..\ConfigurationUtility wechseln.
- Die Datei ConfigurationUtility.exe.config nach der Installation anpassen oder bei einem Update eine bereits erzeugte wieder verwenden.
- Das Programm ConfigurationUtility.exe starten.
- Wenn die Konfiguration abgeschlossen ist, im Browser die URL:
https://server name.domain name/cms
eingeben für den Start des Management (RedDot CMS) Server.
Ab jetzt heißt es, wie immer, viel Spaß und Freude mit dem Management Server - vorallem mit dem Release 16, welches viele neue Features enthält.
Fazit
Wenn man regelmäßig und ohne großen Aufwand seinen Management Server auf dem neusten Stand bringen möchte. Bietet es sich an einmalig die zwei Skripte (Installation und Konfiguration) anzulegen und dann die Updates per Unattended console installation (UCI) vorzunehmen. Das geht schnell, die Konfiguration ist dann immer die gleiche und wenn man viele Server in einem Cluster hat, spart das Zeit.
Auch für die System-Administratoren ist die Anwendung von Unattended console installation (UCI) per PowerShell keine große Sache. Einmal auf jedem System eingerichet, lässt sich ein Update per PowerShell-Remote-Zugriff auf jedem Server in kurzer Zeit durchführen.
Natürlich empfiehlt es sich immer, diese Art der Installation, auf einem eigens dafür aufgesetzten Testsystem vorher zu testen. Jedoch zeigt die Erfahrung, dass innerhalb einer Version die Hotfixes immer mit der gleichen Konfiguration installiert werden. Nur bei Updates (ServicePacks) oder kompletten Releases wird in der Regel ein Reset der Konfigurationsdateien erzwungen. Da sollte man sich genau ansehen was evtl. geändert hat und dies ggfs. anpassen. Wobei das primär die Datei ConfigurationUtility.exe.config und die Management Server Konfigurationsdateine selbst betrifft. Aber dazu mehr, in einem zukünftigen Artikel :)
Weitere ergänzende Informationen dazu findet man auch in der Online-Hilfe unter:
- Handbuch: Installation / Kapitel: Unattended console installation
- Handbuch: Installation / Kapitel: Installing Management Server in a cluster
- Handbuch: Installation / Kapitel: Updating cluster servers
- Release Notes: Kapitel: Installation and upgrade notes
Über den Autor:
... ist Senior Site Reliability Engineer bei der Vodafone GmbH in Düsseldorf. Seit dem Jahr 2007 betreut er zusammen mit seinen Kollegen die OpenText- (vormals RedDot-) Plattform Web Site Management für die deutsche Konzernzentrale.
Er entwickelt Erweiterungen in Form von Plug-Ins und PowerShell Skripten. Seit den Anfängen in 2001 (RedDot CMS 4.0) kennt er sich speziell mit der Arbeitweise und den Funktionen des Management Server aus.