
- RedDot CMS Blog
- 05.12.2016
- EN
rdb: RedDot CMS Navigation Manager Basics
For quite some time now, I’ve noticed that there have been a lot of questions posted up online regarding the use of the Navigation Manager within RedDot CMS. To be honest, I’m not surprised that a lot of users have problems using it (particularly beginners) since there are very few resources/documentation around available explaining how to use it effectively within your projects.
Navigation Manager is a powerful tool that will not only simplify the structure of your projects, but it will also save you an incredible amount of time building the various navigational items that your site requires.
The following is a step-by-step guide which will provide you with the basics on how to incorporate the Navigation Manager into your CMS projects.
Step 1.
Define the layout/structure/styling of the navigational areas for your site.
Before you log into the CMS and start playing around with Content Classes, RenderTags and HTML, it’s extremely important that you take a step back and properly define the structure of the navigational areas for your site. By this I mean, all of the HTML markup, CSS (and possibly JavaScript) required to output each navigational area as per the site design.
If you are lucky, the ‘cutup’ for your site may have been tested, finalised and supplied to you by another designer/front-end developer. If not, then it’s important that you build, test (cross browser testing & HTML validation) the HTML for ALL of your navigational areas. The job of the Navigation Manager is to output the HTML for your areas EXACTLY as you have defined within your cutup. If you miss any navigational features, elements, styles etc within this step, it will be EXTREMELY difficult to rectify this whilst building the navigation areas within the CMS.
Endeavour to keep the HTML structure of your Navigational Areas consistent across all of the projects your build. Use CSS to change the look and feel of the navigation areas only. That way you will be able to re-use the same templates & navigational areas within Navigation Manager for every CMS project you build – build it once, no need to touch it again!
Step 2.
Activate the Navigation Manager within your project
Before you can use it, ensure that it is turned on!
Under General Settings:
Check the ‘Activate Navigation Manager’ option

Step 3.
Prepare your content classes for all navigation-related pages
One important thing you need to know about the Navigation Manager is that you need to explicitly tell it what types of pages within your project you want to ‘show’ within the navigational areas and how those pages are connected together to form the site structure (or tree).
In order for you to do this, you need to do the following:
- Add a common list element to every ‘foundation’ content class within your project.
This list element will be used to connect up the pages within your project to build the site tree.
Make sure that the name of each list is labelled consistently (such as ‘lst_sitepages’ or something similar) to make it easy for you and other developers to distinguish which pages and linking structures will affect the pages listed by the Navigation Manager.
It is important that you only use ‘foundation’ pages to define pages used within your site (i.e. don’t use target containers within your projects for individual pages.) If you need to share common items (such as headers, footers, stylesheets etc) use references instead. Check out Adrian Mateljan’s post on Containers for more information on how to do this. Any pages that are connected via a target container WON’T be displayed within the Navigation Manager.
- Define each ‘Foundation’ Content Class to be a Master Page
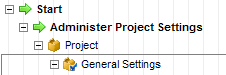
In order for you to use the Navigation Manager to build the navigational areas within your pages; you need to ensure that the following settings are defined for each foundation content class :
Select ‘Master Page Settings’ from the Action Menu when you select the Content Classes within the Tree.
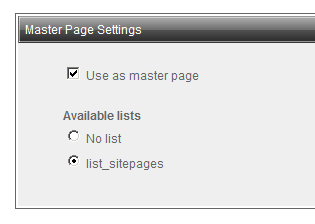
If you don’t select ‘Use as a master page’ checkbox, then the Navigation manager will not include pages created from the content classes within its ‘navigational tree’ – and in turn, the context of where that page sits within the site will be known.
Ensure that the list that you created previously is selected. If you don’t select any lists, then the Navigation Manager won’t include any sub pages connected to the page within the navigation areas.
Step 4.
Create content classes to describe the structure of each navigation level for each navigational area.
Ok, so this is the hard part: Defining the structure of each navigation level for each navigation area within your site. To do this, you need to breakdown each part of the navigation area into individual ‘levels’.
To illustrate this concept, take a look at the following IA diagram for a site:
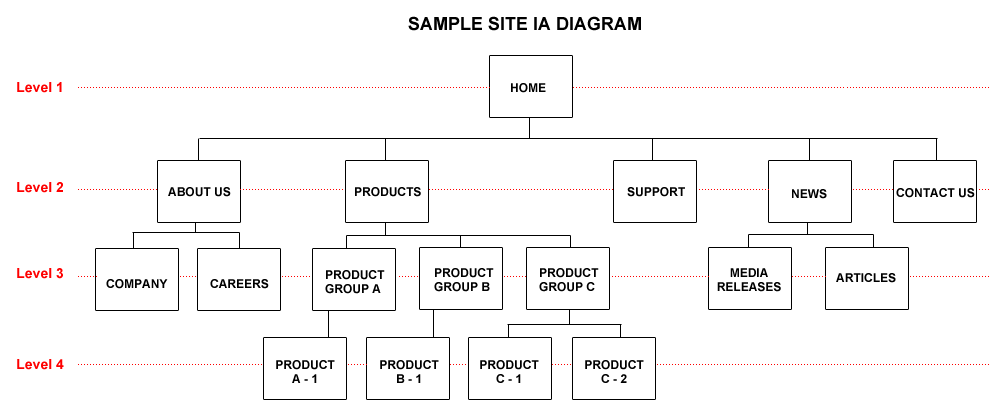
To create a ‘drop down’ Primary Navigation area that is displayed across all site pages, we would need to include links from both Level 2 and Level 3 pages (assuming that we don’t want to display the homepage link).

When hovering over a link, the sub pages for that link (i.e. level 3 pages) are then displayed.
The HTML output for your primary navigational links might look something like this:
<ul>
   <li><a href="">About Us</a>
      <ul>
         <li><a href="">Company</a></li>
         <li><a href="">Careers</a></li>
      </ul>
   </li>
   <li><a href="">Products</a>
      <ul>
         <li><a href="">Product Group A</a></li>
         <li><a href="">Product Group B</a></li>
         <li><a href="">Product Group C</a></li>
      </ul>
   </li>
   <li><a href="">Support</a></li>
   <li><a href="">News</a>
      <ul>
         <li><a href="">Media Releases</a></li>
         <li><a href="">Articles</a></li>
      </ul>
   </li>
   <li><a href="">Contact Us</a></li>
</ul>
Breaking the HTML code down into Content Classes for each level for the Primary Navigation:
Level 1:
Since the first level in the tree is the homepage, we don’t need to display this link. The <navigation:nextlevel> render tag instructs the navigation manager to drill down to the next level so it can continue building more links.
<ul>
   <navigation:nextlevel>
</ul>
Level 2:
Consists of links for each top level section of the site, including a sub list (UL’s) to be wrapped around child (level 3) pages. If no sub pages exist for a site section, we need to ensure that we don’t display the sub list using the ‘HasChildren()’ render tag.
<li><a href="<%!! Context:CurrentIndex.GetUrl() !!%>"><%!! Escape:HtmlEncode(Context:CurrentPage.Headline) !!%></a>
<reddot:cms>
   <if>
      <query valuea="Context:CurrentIndex.HasChildren()" operator="==" valueb="Bool:True">
         <htmltext>
            <ul>
               <navigation:nextlevel>
            </ul>
         </htmltext>
      </query>
   </if>
</reddot:cms>
</li>
Level 3:
Consists of links to each sub page under the top site sections. Since our primary navigation will be limited to display links for site sections and its immediate sub pages only, any other lower pages (level 4) don’t need to be included. All we need to do here is display the sub page link.
<li><a href="<%!! Context:CurrentIndex.GetUrl() !!%>"><%!! Escape:HtmlEncode(Context:CurrentPage.Headline) !!%></a></li>
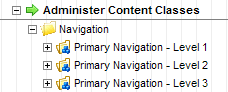
To piece this all together, you need to create separate Content Classes for each level which will contain the various pieces of HTML/RenderTags listed above. I would suggest grouping all of these Content Classes under a ‘Navigation’ Content Class folder.
Step 5.
Setting up the navigation areas within the Navigation manager
Select ‘Browse Navigation ► Project’ and click on the ‘Navigation Areas’ link from the Action Menu.
Create a new ‘Area’ by right mouse clicking on the ‘Navigation Areas’ node
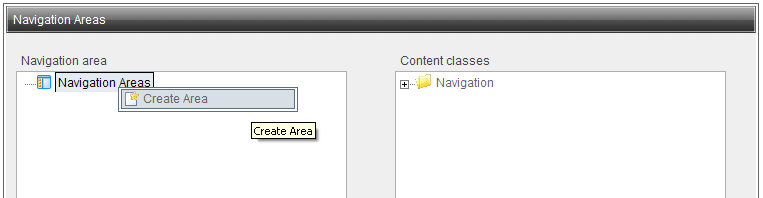
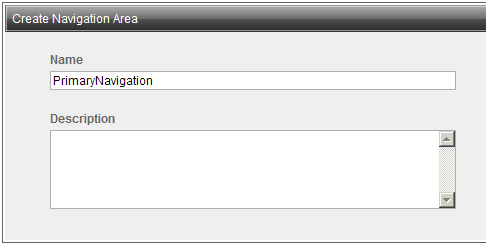
Enter in a name for the new area. This name (or ID) will be used later when adding the area to your foundation pages. For this example I will use ‘PrimaryNavigation’.
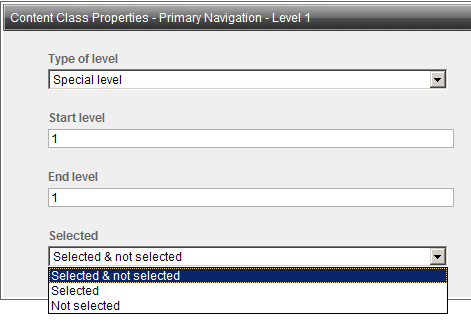
Define each step for the navigation area by selecting the navigation content classes in the right pane and dragging then across to the new area node. You will be presented with options to define which level(s) this content class will applied to and whether or not it will be used for selected for pages in the tree. (Since the Primary navigation will need to display links for all Level 2/3 pages – regardless if they are selected or not – ensure the ‘Selected & Not Selected’ option is highlighted)
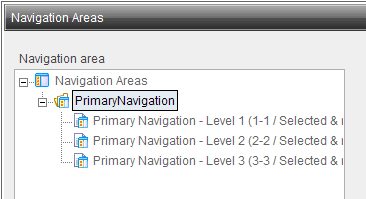
All of your levels will then be listed under the corresponding navigation area
Step 6.
Adding the navigation areas within your Foundation Content Classes.
Add the following tag within your template where the output of the Navigation Area will be displayed. Ensure that the name within the
<%!! Navigation:OutputArea(PrimaryNavigation, Bool:False) !!%>
tag matches the name you have used when creating your navigation area within step 5.
<reddot:cms>
   <htmltext>
      <%!! Navigation:OutputArea(PrimaryNavigation, Bool:False) !!%>
   </htmltext>
</reddot:cms>
Step 7.
Preview your pages in SmartEdit or Preview modes to ensure the navigation area is outputting the correct link.
Although this a very basic example of how to use the Navigation Manager within RedDot CMS, you can use it to output a wide variety of navigational items within your projects such as Primary & Secondary Navigation Links, Breadcrumbs and Sitemaps (including Google sitemaps).