- Internet
- 12.02.2019
- EN
Manuel Schnitger: Language Variants - Workflow and Translation
written by Manuel Schnitger, 13. March 2012

Reach out to the world! Translate your content!
Inspired by a partner and some questions from the community, I would like to describe the different aspects of administering projects with more than one language variant and the need to translate content.
Hint: This article just describes the basics of how to deal with multi-language projects. If you already have a project up and running, then don’t expect anything sophisticated.
Before I try to answer a few questions that might come up, I first start to describe the standard way of how to set up a multi-language project with translation workflow. As a base project I just use the Best Practice Project, that already has two language variants and add a new one.
Step 1: Creating a new language variant
Click path: SmartTree > Administer Project Settings > Language Variants > Action Menu Create language Variant

Figure 1: Create new language variant
In the opening dialogue we have to configure some setting…
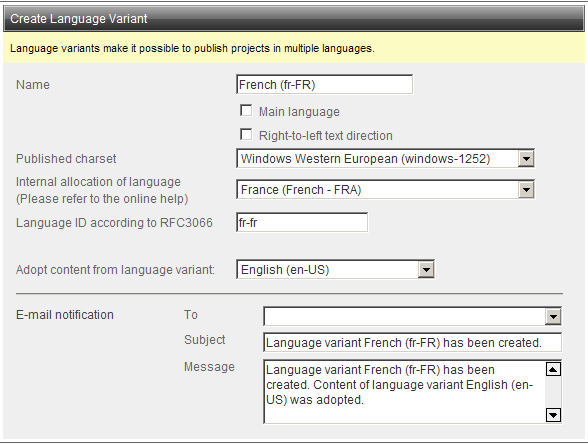
Figure 2: Configure the new language variant
- Name: The name of the language variant can be any name (e.g. English_Test, Weird Accent ;-)) but normally it makes sense to assign a name that really reflects the content of this language variant.
- Main language: If you activate this checkbox, then all content elements with the option Language variant-independent content will just be editable in the main language variant. Modifications of those variant independent elements in main language variant will not trigger any workflow in other language variants. IMPORTANT: If you delete the main language, then you’ll not be able to modify the content of language variant independent elements!!! So set another language to be the main language before deleting the one that was formerly the main language.
- Right-to-left-text direction: Activate this checkbox, for languages/countries (e.g. Saudi Arabia), which are written from right to left.
- Character set: Chose the character set for the new language variant.
- Internal allocation of language: Just chose an allocation from the drop-down list. Shouldn’t be too difficult.
- Language-ID: If you chose an internal allocation (see above), then the language id will be inserted automatically.
- Adopt content from language variant: Chose a language of that you wish to adopt the content from. Hint: If you don’t adopt content from another language variant, then all pages in the new variant will have the headline “Page doesn’t exist in language variant xy”. So as soon as you really don’t want to have any content/structure from another variant, please chose one.
After the new language variant French has been created and the content from the variant English has been adopted, we switch to French in order to check, if everything went well so far. The result should look similar to the screenshot below.
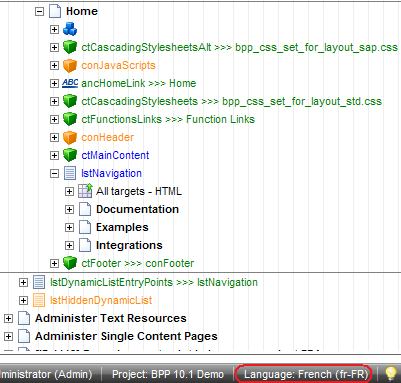
Figure 3: French language variant with English content...great!
Step 2: Defining a translator
As not every editor and author shall/is able to translate content from one language variant to another, we have to define a user and assign a specific role to this user.
Click path: Server Manager > Administer Users and Groups > Users > Action Menu Create User
In the second dialogue we have to activate the option SmartEdit as well as Translation Editor (see figure 4). Note: If you don’t have the option add the role Translator to a user, then you probably don’t have a license for the Translation Editor.
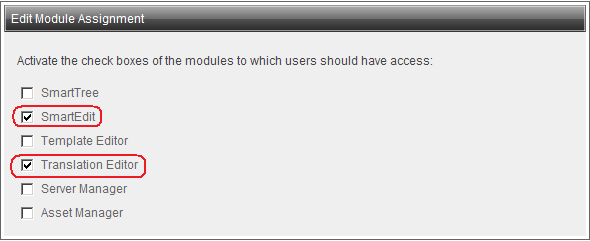
Figure 4: Create user with translation editor role
In the third dialogue we have to assign the user to the project and define that he is allowed to use the translation editor (checkbox TE). As soon as we have the user defined, we go back into the SmartTree mode of our project and define, that the user iTranslate is responsible for translation from English to French.
As we want the translator to translate from the language variant English to French, we click on the language variant English and then on Define Translator in the action menu.

Figure 5: Define Translator
In the following dialogue we just assign the user iTranslate to the language variant French.
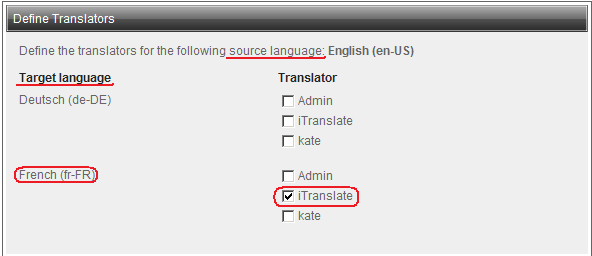
Figure 6: Assign Translator
Step 3: Creating a translation workflow
As the Management Server doesn’t know if content shall be translated and from which source language into which target the translation shall be executed, we have to define this process within a workflow.
Although I think, that setting up a workflow is commonly known, I just go on with this step-by-step approach.
So therefore we just click on a link element (e.g. List_Items) and chose Define Workflow from the action menu.

Figure 7: Create workflow
In the opening dialogue we have to assign a name to the workflow. We can chose any name but it makes sense to assign a name that reflects, what the workflow is intended to do.
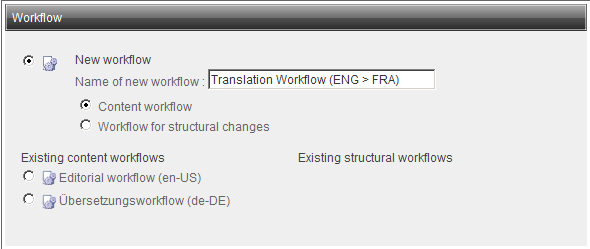
Figure 8: Create workflow
Then we define the language the workflow shall be used for. We could use the same workflow for all language variants, but normally the users/groups which are responsible for approving content differ from one variant to another variant. So therefore we just leave the language variant English activated…don’t do anything else and click on OK.
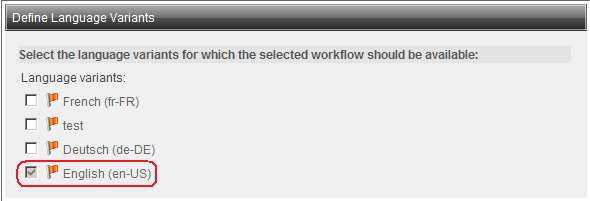
Figure 9: Define language
In order to define, what the workflow should do with the content, we click on the workflow and then on Edit workflow in the action menu.
The Workflow Designer opens and we just create the simple workflow by using Drag&Drop. Hint: At the moment the steps in the workflow are just created for the action Page Created. Please create the same steps for the action Page changed ;) Note: You can add more than one reaction within a workflow step. So you could add a release step (after the page has been created/changed) and in addition to that define, that an email-notification shall be send to a specific user/group in order to inform them, that a new page is waiting for translation/approval/etc……. but the options of the workflow are more a topic for another post.
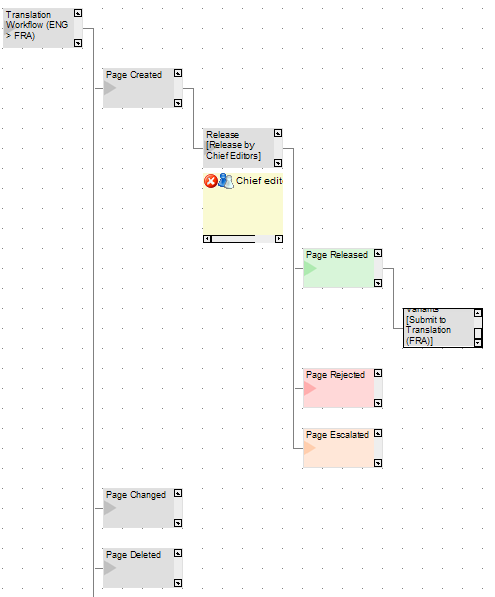
Figure 10: Workflow Designer
The last thing I wanted to mention is the translation step. Please don’t forget to activate the radio button Submit content for translation for the language variant French.
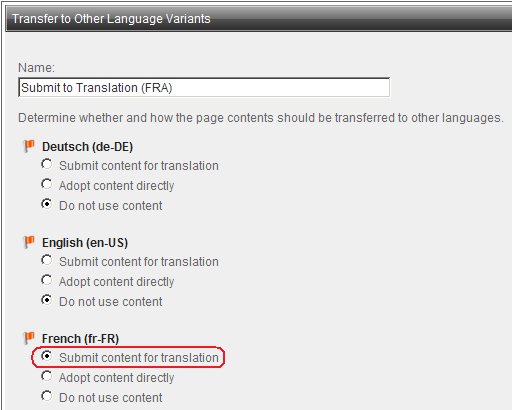
Figure 11: Submit content for translation
Ready!!! After these three steps, the main work has been performed. We have a new language variant, we have a workflow that puts pages into this new language variant (or first of all into the translation editor) and we have a user that can translate the content.
Step 4 – Test, Test, Test
… isn’t really a new step but just a test, if the former three steps were set up in the right way. So first off all I log on with the admin user (could be any other user as well) and modify the content of an article. (I changed the headline to Article English in order to indicate, that this content comes from the variant English. Furthermore I added some text, that has an orange background color.) After I’m ready I send the page into the workflow.
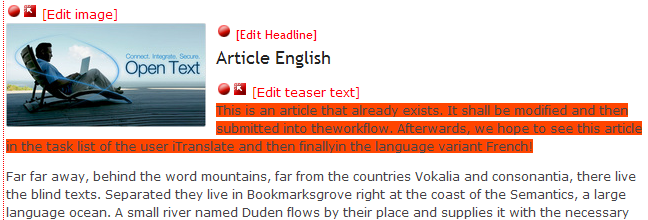
Figure 12: English text is added
As there is a workflow defined that requires the approval of another user (Group: Chief editors), I log on with the user kate as she is a member of this group. Kate enters the Task area and clicks on the item Pages waiting for release. The headline of the page is shown and as soon as Kate clicks on the headline, the page will be displayed in the bottom window of the Translation Editor. As Kate likes the modifications, she releases the page. (Now the page is sent to the language variant French automatically.)
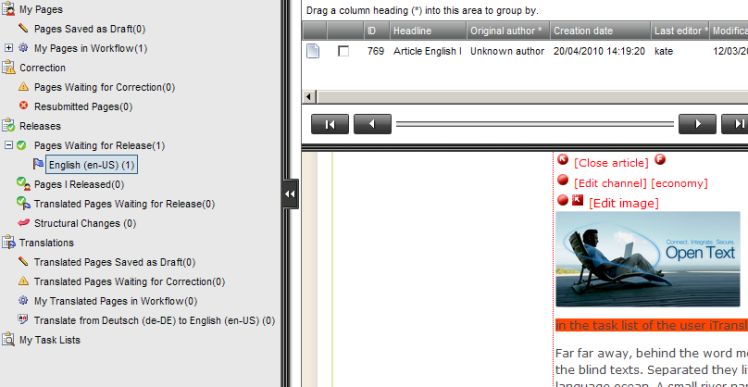
Figure 13: Page will be released
The user iTranslate logs on and sees, that there is one page waiting for translation. All elements that needs to be translated are indicated by a waving flag (Note: In version 11 of the Management Server, the flag will just be a static flag….no animation any longer ;-)). The user iTranslate clicks on the RedDot of the text element and a split screen opens. In the upper window the new text is displayed in green indicating, that this text has been added. In the lower window the translator now can add the text in the language variant French.
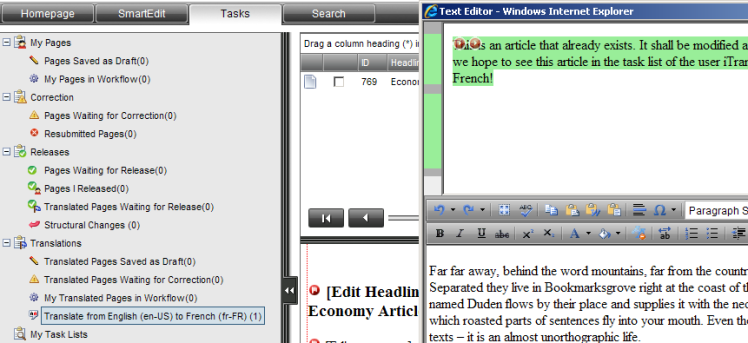
Figure 14: Translation Editor with split screen
After the translation process has been finished, the page can be released and called within the SmartEdit mode. As we can see, there is a new text added to the text element of the French language variant. Of course it’s just English text, but due to the lack of French skills I had to use a workaround.
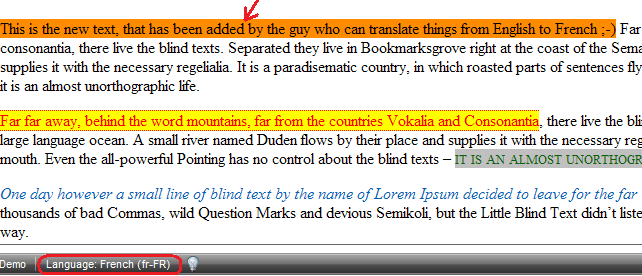
Figure 15: English text has been translated into French. Result is displayed in the French variant of the project
F.A.Q.
Note: I found most of the questions and answers on our community platform (www.SolutionExchange.info) and the RedDot Google groups. So therefore I have to thank the guys of the community for their valuable input.
F: Is the number of language variants limited?
A: No. For the Management Server a language variant is just a table in the project database that stores the language variant depending content.
F: Is it possible to create 2 (or even more) language variants of the same language?
A: Yes. As the Management Server doesn’t really “know” languages, it’s possible to have English (UK), English (US), English (Wales), or German (Germany), German (Austria), German (Switzerland) and so on. Just assign a unique name and you can have as much identical languages as needed.
F: Which character sets can the Management Server publish/support?
A: The Management Server supports the following character sets: Japanese (shift-jis), Chinese Simplified (gb2312), Korean (ks_c_5601-1987), Chinese Traditional (big5), Unicode Standard (unicode), Windows Central European (Windows-1250), Windows Cyrillic Alphabet (Windows-1251), Windows Western European (Windows-1252), Windows Greek (Windows-1253), Windows Turkish (Windows-1254), Windows Hebrew (Windows-1255), Windows Arabic (Windows-1256), Windows-Baltic (Windows-1257), Windows Vietnamese (Windows-1258), ISO Western Europe Latin 1 (iso-8859-1), ISO Central/Eastern Europe (iso-8859-2), ISO South European (iso-8859-3), ISO Baltic (iso-8859-4), ISO Cyrillic (iso-8859-5), ISO Arabic (iso-8859-6), ISO Greek (iso-8859-7), ISO Hebrew (iso(8859-8), ISO Turkish (iso-8859-9), ISO Nordic (iso-8859-10), Latin/Thai (8859-11), Celtic and English (iso-8859-12), Baltic Rim (iso-8859-13), English and Sami (iso-8859-14), ISO Western Europe Latin9 (iso-8859-15), ISO Japanese (iso-2022-jp), Korean (iso-2022-kr), Korean (euc-kr), Unicode compressible (utf-8). So that means, that you can publish almost all character sets in a native way. Whenever you should find a language variant with a character set, that is not part of the list, then just use Unicode or UTF-8 and that will work for sure.
F: Is a spellchecker part of the out of the box functionality?
A: Yes. During the installation, the connection to the spellchecker can be configured.
F: Which languages are supported by the spellchecker out of the box?
A: The spellchecker provides the following dictionaries: Danish (Denmark), German (Germany), English (United Kingdom), English (United States), Spanish (Spain), French (France), French (Belgium), French (Canada), French (Luxembourg), French (Switzerland), Italian (Italy), Italian (Switzerland), Dutch (Belgium), Dutch (Netherlands), Norwegian (Norway), Portuguese (Brazil), Swedish (Sweden), Swedish (Finland).
F: How can I define different date formats for different language variants?
A: In the second dialogue of a standard field you can chose the type of the field. If you select Date from the drop down box, then the locale as well as the date format can be defined. If you chose User-defined as the date format, then you can also insert Custom Date/Time Formats . The same functionality applies to the different info elements which can display dates such Creation date of a page, Modification date of a page, Release date of a page, etc.

Figure 16: Select the date format
F: What is language variant indepented content used for and how can I modify this content?
A: Language variant independent content is related to the main language of a project. Every project has a maiain language. This is normally the first variant that is being created while the project is created. However the main language can be switched if there is more than one language in the project. If there is content in the project, that is the same for all language variants (e.g.: Banner, Logo, etc.) then there is the option (for texts, images, standardfields, etc.) to define that this content is language variant indepentend. Placeholders with this option can just be modified in the main language. As soon as such elements are modified (and released) in the main language, the content of those elements will be available and displayed automatically in all other language variants. No workflow will be triggered and therefore the content doesn’t have to (and cannot) be released in the other languages.
F: Is the translation editor/manager something that has to be licensed? And what is the difference between the two modules?
A: Yes, both modules need to be licensed. The Translation Editor is a module, that allows translators to translate content online. So whenever a user with the role “Translation Editor” logs on to the system, he sees the content, that has to be translated within his task area of the Management Server. The Translation Manager is a module, that exports the content (headline, text, standardfields, etc.) of pages -which are currently in the Translation Editor- and stores it as files in the file system. The format of the exported files is XLIFF and is well understood/supported by the most common translation tools which are used by translation agencies.
F: Why does it make sense to create a seperate translation workflow for each language variant?
A: The more languages you have in a project, the more unlikely it is that the group of users who are responsible to approve content, do speak lots of languages. Therefore it makes sense to define workflow for every language. So the users who speak English are responsible to release English pages, the users who speak French are responsible to release French pages and so on.
F: Can I exclude specific areas of my web site from being translated?
A: Yes, as workflows can be defined for specific areas of the project and translations are triggered by workflows, it is possible to assign different workflows to different areas. Then the pages of one area are being submitted into a translation workflow and the pages of another area are not.
F: Is there any way how a user, who rejects a page (within an editorial workflow) can inform the author about the reason of the rejection?
A: Yes, simply expand the nodes under a content class, click on the node Notes and then on Create Note in the action menu. You can then add a note for a specific content class and chose whether this note shall be of the format Standardfieldor Text.
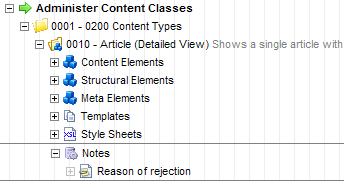
Figure 17: Note can be added to a content class
F: Is there a relation between language variants (of a project = published web site) and the languages of the interface? And which interface languages are provided?
A: Technically spoken there is no relation between the language variants of the project and the languages of the frontend/interface. Of course a user from France will probably work within the language variant French and will use the French interface language, but that’s just defined by the user himself or the administrator. It is also possible (without any problems) to work within a language variant German and use the interface language English or Spanish etc. The following interface languages are provided by the Management Server: Chinese, Czech, Dutch, English, French, German, Greek, Hungarian, Italian, Japanese, Polish, Portuguese, Spanish and Swedish.
When writing this article I really tried to cover most of the topics which are related to languages, workflows and translation….and I’m pretty sure, that I forgot exactly the questions & answers you’re most interested in So if you think, I can help you, then give me the chance to answer and post a comment or just drop me a line (manuel.schnitger[the_funny_character_that_combines_the_name_with_the_domain]opentext.com).
Again: Reach out to the world, translate your content!
Source: Language Variants, Workflow & Translation
© copyright 2012 by Manuel Schnitger