- Internet
- 01.01.2019
- EN
Manuel Schnitger: Limited time? Limited experience? More efficiency!
written by Manuel Schnitger, 25. August 2011
If one or more statements applies to your situation, then it might make sense to read the rest of this article ;)
- You are responsible for an Open Text Management Server (fka RedDot CMS).
- As you also have other things to do, you have limited time to deal with the Management Server.
- You attended the training courses, but that was some years ago and you forgot much/most of the things you were taught.
- You hope that the system(s) run stable and without too much investment of your time.
- You have a colleague who substitutes you when you are absent….this colleague does just have basic knowledge.
- And finally: You would like to be organized a bit better in order to work more efficiently.
OK, the probably best thing would be to join the training courses again in order to refresh your knowledge. But let’s be realistic….how likely is it that your company pays for courses you already joined before. Probably less than 50% ;) And how likely is it that you will have more time in the future?
So we have to find ways to somehow organize things and manage knowledge in a better way.
What you could do is:
- automate things
- write step-by-step descriptions of things you have to do from time to time
- create a checklist that makes sure you remember what has to be done
Try to automate things that you would normally do manually
Monitoring disk space
If you enter “monitor disk space” as a search term in Google then you will get lots of free ware tools which can be used to monitor the disk space and which send out a mail if a predefined percentage is reached.
- Q: Why is it meaningful to monitor the disk space?
- A: When working with the Management Server, different things happen which lower the free disk space:
- Pages are created and need space into the project database
- Assets are uploaded and stored in the file system or the project database
- Log files are being written (\Program files\Open Text\WS\MS\ASP\Log\)
- Publishing reports are stored
- if Versioninig is activated, the versioned content needs space
- and last but not least every action of an author that affects the database, is stored in the database with the name “<projectname>.ldf”Hint: If the project.ldf is very big and you would like to shrink it, then go to the site: http://support.microsoft.com and enter “shrink ldf” as the search criteria. Then you’ll probably find a description that can be used for your database. (The same applies to customers who use Oracle instead of SQL Server)
So the longer the Management Server runs the less free disk space is available. The result of maybe just 2 MB free disk space can lead into weird issues which noone would relate to the disk space.
Sample: When PreExecute is used in the content classes, then the following steps are executed when the preview of a page is called:
- The script code is cut out of the page
- The pieces of script code are put into the file system
- The code is executed by the IIS and afterwards put back into the page.
If the free disk space does not even allow that the script code snippets are placed into the file system, then you will probably call the support team and tell them, that the code that worked yesterday does not work today ;)
Ok, before we start with some user defined jobs that can help you maintaining your server, I will just describe how a user defined job can be created and what a user defined job is. A user defined job can call an RQL statement, or a URL (E.g.: http://localhost/MyFileThatDoesSomething.asp) or a .bat/.cmd/.exe file. The execution of the job can be scheduled (e.g.: every week at nine o’clock on wednesday) or event controlled (e.g.: every time, when a page is being released within the workflow). In the samples below I describe some user defined jobs which can help you to maintain the editorial server.
Setting up a user-defined job step by step
Step 1: Enter the Server Manager and click on “Create User-defined job”
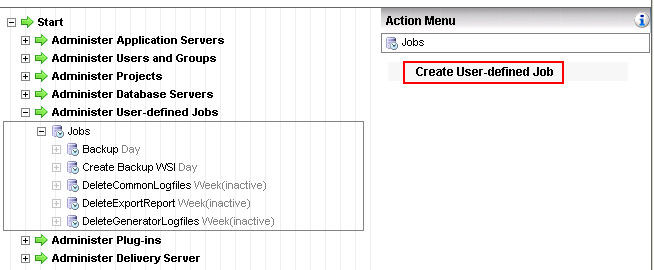
Figure 1: Create new job
Step 2: Activate the option “Call periodically” and decide in which interval the job shall be executed.
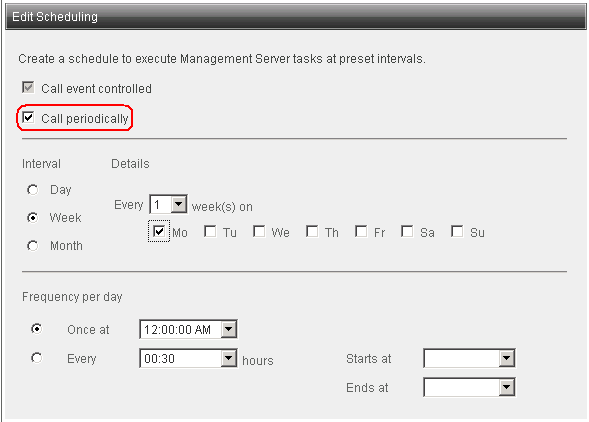
Figure 2: Schedule the job
Step 3: Activate the option “RedDot Query Language Command” and enter one of the RQL commands that are listed below. Make sure that the specific GUIDs used in the RQL command are the GUIDs of your server/project. (How the required GUIDs can be identified, is described a little bit later.)
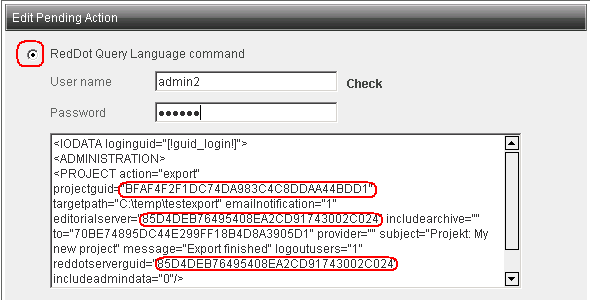
Figure 3: Enter the RQL statement, that shall be executed. (More info below)
Step 4: Test the job! Before you rely on the job, you should test it. Therefore just click on “Start Job”…..wait a few (60?) seconds and click on “View log file”. (As a quick test just search for the strings “error“, “warning” and “failed“. If these strings are not being found, then the job should have worked. Another quick test is to check, if the job has done, what it is intended to do: (Log files deleted, project export created, etc.). )
Hint: The parameter [!guid_login!] is inserted automatically as well as the session key, if required.
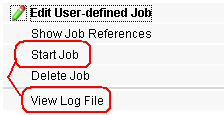
Figure 4: Test the job and have look in the log files afterwards
How to figure out the GUID of a project, a user, a page, etc.
Normally when you use user defined jobs you have to insert the GUID of the “thing” you want to work with into the RQL command. Therefore just click on the “thing” and then on the info icon on the top of the action menu. In the opening dialogue you’ll then find the GUID. On the sreenshot below you see how to get the GUID of a project and on the next screenshot it is shown how to get the GUID of the editorial server.
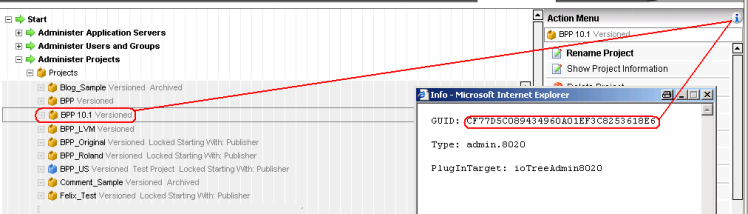
Figure 5: How to get the GUID of a project
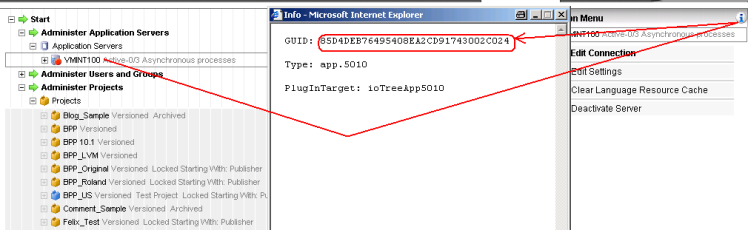
Figure 6: How to get the GUID of the editorial server
Backup
In order to create backups of the project you could use a script that copies the database files as well as the assets -if stored in the file system- in order to have a backup. But you could also use out-of-the-box functionality to do this. What you have to do, is creating a user-defined job that uses a small RQL statement.
<IODATA loginguid="[!guid_login!]">
  <ADMINISTRATION>
    <PROJECT
      action="export"
      projectguid="BFAF4F2F1DC74DA983C4C8DDAA44BDD1"
      targetpath="C:\temp\testexport"
      emailnotification="1"
      editorialserver="85D4DEB76495408EA2CD91743002C024"
      includearchive=""
      to="70BE74895DC44E299FF18B4D8A3905D1"
      provider=""
      subject="Projekt: My new project"
      message="Export finished"
      logoutusers="1"
      reddotserverguid="85D4DEB76495408EA2CD91743002C024"
      includeadmindata="0"
    />
  </ADMINISTRATION>
</IODATA>
Of course you have to modify the GUIDs in the RQL statement as it comes from my server.
Delete publishing log files
When using this RQL statement for a user-defined job, all publishing logfiles (C:\Program Files\RedDot\CMS\ASP\LOG\Publishing) which are older than 3 days, will be deleted.
<IODATA loginguid="[!guid_login!]">
  <ADMINISTRATION>
    <LOGDIR
      action="delete"
      donotlog="1"
      guid="Publishing"
      days="3"
      format="1"
    />
  </ADMINISTRATION>
</IODATA>
Hint: I have tested the same statement with “Import” as the parameter “guid” and all log files of the folder “import” were deleted … so I assume, that you could create jobs for all kind of log file folders.
Delete publishing reports
Next to the publishing log files which are stored in the file system there are the publishing reports, which are stored in the project database. These are the ones which are mailed to predefined users of the system after a publishing job has been finished.
<IODATA loginguid="[!guid_login!]">
  <ADMINISTRATION
    action="validate"
    guid="[!guid_login!]"
    useragent="Mozilla/4.0 (compatible; MSIE 5.5; Windows NT 5.0; T312461)"
   >
    <PROJECT guid="25015EEF651547199473153946B7744D" />
  </ADMINISTRATION>
</IODATA>
<IODATA sessionkey="[!key!]">
  <PROJECT
    guid="[!guid_project!]"
    sessionkey="[!key!]"
   >
    <EXPORTREPORT
      days="2"
      action="deleteall"
    />
  </PROJECT>
</IODATA>
Hint: As you can see, you have to insert the GUID of a specific project in the RQL command above. That implies that you have to create one job for each of your projects.
Delete Common logs
Each mouse click within the Management Server results into a log entry in a log file called RDCMS.log (\Program files\Open Text\WS\MS\ASP\Log\Common\). As soon as the file size of the files reach 1 MB another file will be opened and the “old” file will be renamed from RDCMS.log to RDCMS_[timestamp].log. Depending on the number of users and their behaviour the amount of data can increase faster or slowlier.
<IODATA loginguid="[!guid_login!]">
  <ADMINISTRATION>
    <LOGDIR action="delete" donotlog="1" guid="Common" days="3" format="1"/>
  </ADMINISTRATION>
</IODATA>
Hint: Don’t just configure and schedule the user defined jobs. Test every job by starting it manually and view the log file afterwards. If everything is ok, then you can rely on the job. But if you don’t test the jobs you may end up with a bad surprise ;)
Write step-by-step descriptions for things you (or your colleagues) don’t do that often
If you have to do things very rarely then it is likely that you forget where a specific button is…. where a log file can be found…. how a task has to be set up etc. In order to speed up such things, it can be helpful to create a step-by-step guide that allows you or even colleagues who just have very limited experince to do this specific task.
Sample: Creating a user and adding this user to a project & group
- Required information: User name, full name, role(s) in the project(s), project(s) the user should work with, group(s) within the relevant projects.
- Enter the URL http://196.190.10.10 into the browser (Use IE in order to work in the Server Manager)
- Choose the tab “Server Manager”
- Follow this click path: Start > Administer Users and Groups > Users > Action menu: Create user
- In the first dialogue the personal data has to be entered.
- The second dialogue contains the general modules the user is allowed to use. (Project independend)
- The third dialogue is used to a) assign the projects the user should work with and b) the role of the user in the correspondend project.
- If the user shall be part of a group within a project follow the click path: Start > Administer Users and Groups > Users > Users and Groups per project > [Project] > Groups > [Group] and click on “Assign User” in the action menu.
- Search for the just created user and click on OK, when the right users has been found.
- Log off
- Log in with the account of the new user and make sure that the login data is correct.
- Send a mail to the user and tell her/him the account data (user name & password) and ask the user to change the password.
- If you don’t succeed, call Bob as he has done this task previously ;)
Hint: If you have written manuals or set up user defined jobs or did other things which might be helpful and you have a colleague that substitutes you, when you are on vaccation then, it would be a good idea to introduce the colleague BEFORE you leave ;) So if you should have written a step-by-step guide how to create a new user and add this user to a project and a group then just give this colleague the guide and ask her/him to perform this task just by following the manual. If the colleague has been successful even without asking you a single question then you can be sure that you can enjoy your vaccation. ;)
Create a monthly checklist
If you do specific things on a regular basis, then you will probably need less time. Therefore it makes sense to create a monthly check list that contains the things you have to do. Such a checklist could just be created as a task in Outlook or other mail clients and you will then be remembered automatically. The following things could be part of this monthly checklist:
Asset Manager Maintanance
What does it do?
It deletes assets which are not used on pages and which are not used as preassigned assets. But the functionality not just deletes the assets but can also archive them in a folder of your choice (UNC paths also possible). So a good approach would be to
- archive the unused assets under a path that can be accessed by the authors
- inform the authors about the Asset Manager Maintanance and that they can acccess the (archived) files via the file system.
Results:
- There are less assets in the Asset Manager = more efficient work because searching for assets is faster.
- If there is a need to use an archived asset then it’s still available.
Note: In order to use this functionality the assetts have to be stored in the file system.
Delete unlinked pages
Whenever a page is not deleted but just unliked from a list, anchor or container, this page can be found in the SmartTree under Start > Administer Project Structure > Edit Special Pages > Edit unlinked pages. I have heared that some users use the unliked pages area to “store” pages that they would like to use later in the project but normally unliked pages are not used any longer and can be deleted. Unliked pages don’t have a big negative impact on the project but to keep the project clean, it makes sense to deleted them or a regular base.
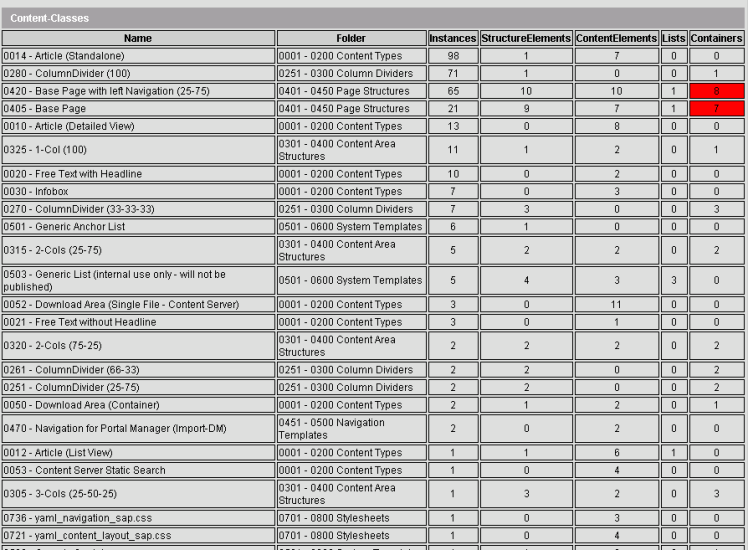
Check the usage of the content classes in your project
If a project is being used some years it might happen that specific content classes are not used any longer. Maybe they have never been used, maybe there were different content classes for the same purpose or maybe there are now other content classes who replaced the old ones. In order to have a clean project, it’s a good idea to get rid of unused content classes.
- Q: How can I figure out which content classes are not used?
- A: Open the Server Manager and create the Support Information (Server Manager > Start > Administer Application Servers > Application Server > Action Menu: Create Support Information).
The “Support Information” is a package (zip file) of logfiles and other things which are often required by the support team. But as part of the package you will also find an xml file with a similar name like this one: msinfo-ex-VMINT100-2011-6-30-10-52.xml
The next step is to download an XSL file of our R&D team that is provided at Solution Exchange.
The next and last step is to add these lines to the XML file: <?xml version=”1.0″?><?xml-stylesheet type=”text/xsl” href=”report.xsl”?> If you now open the XML file with your browser you’ll see lots of information regarding the project on the server.
One information that is important is the number of instances of each content class. Now you know which content classes are being used and which could possibly be deleted. If you would like to avoid deleting the wrong content classes, you can export the templates or just create a backup of the project.
Hint: Please don’t delete the content classes which are used for the navigation ;) They don’t have instances but are required for rendering the navigation.
If this article has been helpful for you…..perfect! If not…. don’t tell anyone about this fact ;)
Source: Limited time? Limited experience? More efficiency!
© copyright 2011 by Manuel Schnitger