
- Internet
- 23.10.2018
- EN
Manuel Schnitger: RQL in a nutshell - Part III
written by Manuel Schnitger, 17. February 2011
You’ve read RQL in a nutshell part I & II and wonder if you can use RQL with other programming languages such as PHP, C# or even client side scripting languages based on AJAX? Well, this article demonstrates that you can just use the programming language you’re most familiar with to create RQL applications. With a small piece of ASP code we can create a universal connector that can be used as a kind of bridge that leads to the Management Server.
But before I begin with explaining what we can do and how we do it, I’d like to mention, that this article could not have been published without the great work and the support of the U.S. Consultant Team of the Open Text Web Solutions Group. Thanks very much guys!
- Q: What’s the purpose of this (universal) RqlConnector?
- A:
1) You can stick to the programming language that you already use.
2) If you use AJAX (=client side script) for the logic of your RQL application and let the RqlConnector just execute the statements then there is less load on the Management Server.
RQL with AJAX
In this sample we will load the headline of a page and display the headline in an alert window. As there are a few more steps to do comparised to the other blog articles, I’ll write down each step you will have to do.
Step 1: Under the plugins folder create a folder called “load_site_map_name” (You don’t know the plugins folder? Read the article RQL in a nutshell ;-) )
Step 2: Download the AJAX library under this url: http://code.google.com/p/jqueryjs/downloads/detail?name=jquery-1.3.2.min.js
Step 3: Save the downloaded file in the just created folder
Step 4: Copy the plugin definition file “sample.xml” into the folder, rename it to “load_site_map_name.xml” and modify the values as displayed on the screenshot. (Don’t know, where the file can be found? Read the article RQL in a nutshell ;-))
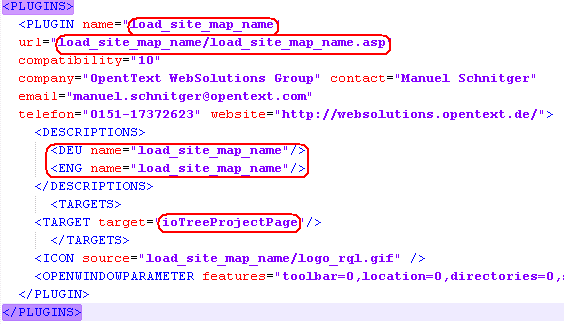
Figure 1: Plugin definition file
Step 5: Create a file called RqlAction.asp based on the following code in the same folder.
<?xml version="1.0" encoding="utf-8" ?>
<%
Response.ContentType = "text/xml"

' Declare the objects
Dim objIO, xmlData, sError, retXml

' Create the objects
set objIO = Server.CreateObject("RDCMSASP.RdPageData")
objIO.XmlServerClassName = "RDCMSServer.XmlServer"

' Get the form data ....our RQL statement
xmlData = Request.Form("rqlxml")

' Execute the RQL statement
xmlData = objIO.ServerExecuteXml (xmlData, sError)

' Kill the object
Set objIO = Nothing

' Error handling
If sError <> "" Then
  retXml = "<ERROR>" & sError & "</ERROR>"
Else ' Transfer the result (RQL response) back to the calling file/function
  retXml = xmlData
End If

Response.Write(retXml)
%>
Description: The file RqlAction.asp is the bridge between the logic part of your application and the Management Server. As you can read in the source code, the file just gets the form data (our RQL statement) executes the statement and gives the result back to the calling application. So if you use a programming language that has the ability to send http calls, then you can use the bridge.
Step 6: create a file called “load_site_map_name.asp” in the folder “load_site_map_name” and paste the code below into this file.
<html>

<head>
    <%
    strLoginGuid    = session("loginguid")
    strSessionKey   = session("sessionkey")
    strPageGuid     = session("pageguid")
    %>
    <script type="text/javascript" src="jquery-1.3.2.min.js"></script>
    <script type="text/javascript">
        var strHeadline;
        // wait till the file has been loaded completely before starting the RQL
        $(document).ready(function () {
            // call the function that gets the headline of the page
            LoadPageSiteMapName("<%= strPageGuid %>");
        });

        function LoadPageSiteMapName(PageGuid) {
            //load simple page info. Therefore we create the RQL statement by using the function padRQLXML that adds the IODATA tag to our RQL statement
            var strRQLXML = padRQLXML("<PAGE action=\"load\" guid=\"" + PageGuid + "\"/>");
            // send the complete RQL statement to the rqlaction  file that just executes the statement
            // rqlxml is the name of the parameter that is requested by the file rqlaction.asp
            // strRQLXML is the variable that contains the RQL statement
            $.post("rqlaction.asp", {
                    rqlxml: strRQLXML
                },
                function (data) {
                    // extract the headline of the page
                    strHeadline = $(data).find("PAGE").attr("headline");
                    // open an alert window that displays the headline of the page
                    alert(strHeadline);
                }, "xml");
        }

        function padRQLXML(innerRQLXML) {
            return "<IODATA loginguid=\"<%= strLoginGuid %>\" sessionkey=\"<%= strSessionKey%>\">" + innerRQLXML + "</IODATA>";
        }
    </script>
</head>

<body>
</body>

</html>
The files in your directory should now look like the image shown below:
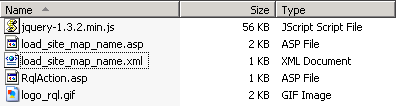
Figure 2: Files in the folder
Description: As you can see there are some session variables at the top of the code that are needed to execute the RQL statement. As we cannot get ASP session variables without ASP this has to be done by using ASP code. In the next few lines the JQuery library is being referenced and the document.ready function makes sure that the implemented functionality is just executed after the whole page has been loaded. After that the function “LoadPageSiteMapName” is executed. Within the function a (sophisticated :) ) function (padRQLXML) is called to combine the RQL statement itself with the IODATA tag that surrounds the RQL statement. (The function padRQLXML saves a few lines of code and the RQL statement could also have been created without this function in the way described in my ealier articles regarding RQL.) The most important line of code is the line that calls the file “rqlaction.asp” ($.post(“rqlaction.asp”, { rqlxml: strRQLXML }). Here we can see that the “RqlConnector” is called to execute the RQL statement. In the next few lines the headline of the page is retrieved and displayed in an alert window.
Step 7: Enter the SmartTree, click on a page and then call the plugin. If you see the same result as displayed on the figure below, then this is exactly what should have happened.
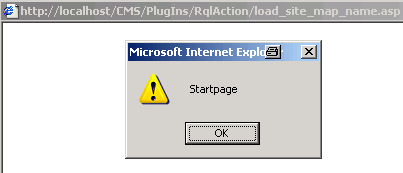
Figure 3: RQL via AJAX.... the result!
Of course you can do whatever you want with the result and alerting it is not the most sophisticated option but this article should just demonstrate how RQL applications can be implemented with client side code or any other programming language next to ASP.
As usual….please just leave a comment if you have any questions or when anything goes wrong. It will then be probably my fault and I’ll try to figure out the reason.
Have fun with RQL!
Manuel
P.S.: If you should be interested in more plugins that use AJAX, then please check out the solutions of Jian Huang on www.SolutionExchange.info. He implemented all his plugins using AJAX.
Source: RQL in a nutshell - Part III
© copyright 2011 by Manuel Schnitger